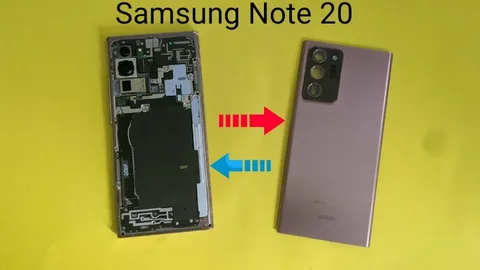
The Galaxy Note 20 Ultra is a premium smartphone known for its stunning display and advanced features. Unfortunately, even a phone this powerful isn’t immune to accidents. A cracked or non-responsive screen can make it difficult—or even impossible—to use your device effectively. That’s where a DIY screen replacement comes in handy.
If you’re considering a Galaxy Note 20 Ultra Screen replacement, you’re not alone. Whether due to drops, scratches, or display malfunctions, many users face this issue. While sending it to a service center is one option, doing it yourself can save money and time if done carefully. This guide will walk you through the entire process from tools to installation.
What You’ll Need Before You Begin
Before starting the replacement, gather all the necessary tools and components. You’ll need a replacement screen (AMOLED with digitizer), heat gun or hairdryer, suction cup, plastic prying tools, tweezers, and a screwdriver set (preferably with a Phillips #00 bit). It’s also a good idea to have isopropyl alcohol and lint-free wipes on hand.
Ensure your work area is clean and static-free. Power off the device completely and remove the SIM card tray. Take your time with each step—screen replacements are delicate procedures, and rushing can cause further damage.
Step 1: Heat and Loosen the Back Cover
To access the internal components, you first need to remove the back cover. Use a heat gun or hairdryer to apply moderate heat around the edges of the back panel. This softens the adhesive holding the glass in place. Be sure not to overheat the phone, as excessive heat can damage internal parts.
Once heated, use a suction cup to lift a corner of the back cover gently. Insert a plastic prying tool into the gap and slide it around the edges. Work slowly and carefully to avoid cracking the glass or damaging internal components.
Step 2: Disconnect the Battery
After removing the back cover, locate and unscrew the metal bracket that covers the battery connector. Use a plastic spudger to disconnect the battery. This step is crucial to avoid short circuits or damage during the screen removal and installation process.
Never use a metal tool to disconnect the battery, as it could spark and damage the motherboard. Once the battery is safely disconnected, set the device on a clean, static-free surface before continuing.
Step 3: Remove the Broken Screen
Now it’s time to remove the damaged screen. Like the back cover, the screen is held in place with adhesive. Use your heat gun or hairdryer to heat the front of the phone, focusing on the edges. Apply heat evenly to soften the adhesive around the display.
Use the suction cup to gently lift a corner of the screen, then insert a plastic prying tool underneath. Carefully work your way around the edges. As you lift, be mindful of the screen’s flex cables—they must be disconnected gently from the motherboard before fully removing the display.
Step 4: Clean and Prep the Frame
With the broken screen removed, you’ll likely notice leftover adhesive and glass fragments. Use tweezers to carefully remove debris and a lint-free cloth with isopropyl alcohol to clean the frame. This ensures the new screen sits flush and adheres properly to the phone.
Take extra time during this step. A clean surface prevents pressure points or loose edges in the final installation. Do not reinstall the screen without thoroughly cleaning the frame, as this can lead to screen lifting or damage later.
Step 5: Install the New Screen
Before sealing everything back up, test the new screen. Connect the replacement display to the motherboard and power on the device (without reattaching the back cover yet). Check that the touch and display functions are fully responsive. If everything works, power down and proceed to the next step.
Apply new adhesive strips or a thin layer of screen glue along the frame. Carefully align the screen and press it into place. Use light, even pressure to secure it. Make sure there are no gaps or raised areas before letting the adhesive set.
Step 6: Reconnect the Battery and Reassemble
Reconnect the battery cable and reattach the metal bracket that holds it in place. Double-check all other cables and connectors to ensure nothing is loose or misaligned. Carefully place the back cover and apply new adhesive or double-sided tape.
Use gentle pressure to press the back panel into place. If needed, reheat the edges slightly to help the adhesive bond. Once sealed, power on your device to confirm everything is working correctly—especially touch sensitivity, display quality, and charging.
When to Avoid DIY Screen Replacement
While DIY repair is cost-effective, it’s not always the best choice. If your device is still under warranty or if you’re unsure about opening your phone, consider professional help. Mistakes can be costly—damaging the motherboard or battery can render the phone unusable.
Additionally, if your screen damage includes display discoloration or internal screen issues, make sure you’re purchasing the correct full assembly (OLED + digitizer). Installing only the glass won’t fix deeper problems.
Benefits of DIY Screen Replacement
DIY repair offers several advantages. You can save a significant amount compared to official repair services, and you’ll learn more about your device in the process. With the right tools and patience, you can restore your phone to like-new condition at home.
It also reduces downtime. Instead of waiting days or weeks for a repair service, you can finish the process in a couple of hours. If done correctly, a DIY Galaxy Note 20 Ultra Screen replacement can offer the same functionality and look as a professional repair.
Final Tips and Safety Notes
Always use high-quality parts for replacement. Cheap screens often suffer from poor color accuracy, laggy touch response, or quicker degradation. Make sure your hands are clean, your workspace is dust-free, and avoid using metal tools around sensitive components.
Take breaks if needed and never force any component. If you encounter resistance, double-check that all screws and connectors are removed. Following these steps carefully ensures a smooth and successful screen replacement.
Conclusion
Replacing the screen on your Galaxy Note 20 Ultra is a delicate but doable process. With the right tools, careful attention, and patience, you can bring your phone back to life and avoid costly service charges. Just be sure to follow each step carefully and take proper safety precautions along the way.
A DIY screen repair might seem daunting, but once completed, it can be incredibly rewarding. You’ll not only save money—you’ll gain a valuable skill and a deeper understanding of how your device works.


